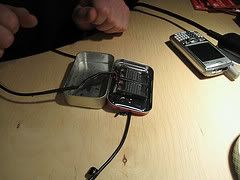
A little soldering is all it takes to make this cool little emergency cell phone charger. You might be able to find the mini solar panels at a store that sells science or electronics equipment;Please note, you'll also be cutting the wire on the cell phone charger, so make sure it's not the only one you have! It's AC or car compatible, since you'll only be using the end that plugs in your phone.
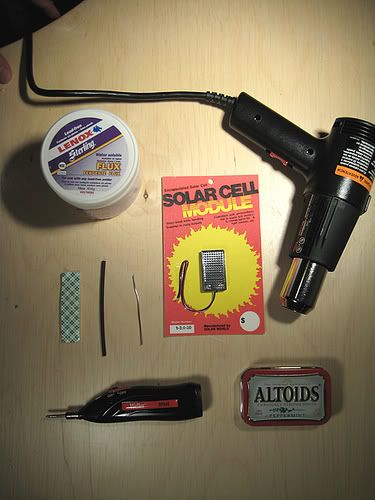
MATERIALS:
* 1 Altoids Tin case
* 2 Mini Solar Panels (3V 20mA each)
* 1 Solder (3")
* 1 Small Heat Shrink Tubing (4")
* 1 Large Heat Shrink Tubing (4")
* 1 Double Sided Tape (3")
* 1oz Flux
* 1 Solder Iron
* 1 Heat Gun
* 1 Wire Stripper
* 1 cell phone charger
STEP 1: Cut wires & tubing
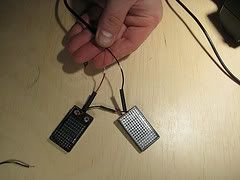
Take the 2 solar power panels and cut all four wires to about 1" in length. Cut 1/4" of plastic off of the tip of each wire with the wire stripper so copper wires are exposed. This exposed wire is called a 'lead.' Cut thesmall heat shrink tubing into four equal pieces (1" each). Slide the small heat shrink tubing onto both black wires.
STEP 2: Solder solar panel leads
Using a toothpick, paint leads with flux on a red wire from one solar panel, and a black wire from the other solar panel. Put those two leads together, and solder using your piece of solder and the soldering iron.
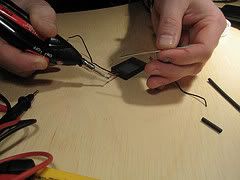
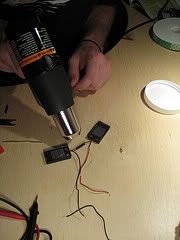
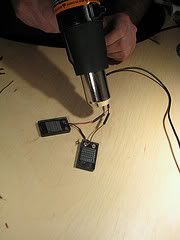
STEP 3: Heat-shrink tubing
Slide small heat shrink tubing over the leads you just soldered together. Heat the tubing with heat gun just enough for it to shrink.
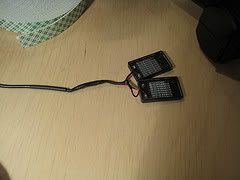
STEP 4: Cut phone charger wire
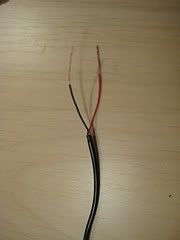
Cut off the wire from your old charger to about 2.5 feet and strip off 2.5" of outer plastic from the loose end. Cut 1/4" off of each of the inside wires to make leads. Slide the full length of the large heatshrink tubing onto this main wire for later use in Step 6.
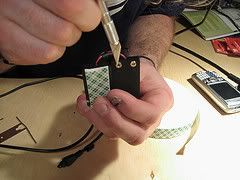
STEP 5: Flux, solder and heat-shrink loose leads
On your main wire, slide a piece of small heat shrink tubing onto the red wire. Flux all loose leads of main wire as well as the solar panels with the toothpick. Solder red leads from main wire and solar panels together. Repeat with black wires. Slide heat shrink tubings over these soldered leads and use heat gun to shrink.
STEP 6: Test charger
Test the charger by connecting it to a phone under bright light.
STEP 7: Heat-shrink solar panel leads
On your main wire, slide large heat shrink tubing over the two soldered leads which connect to the solar panels. Use the heat gun to shrink the tubing.
STEP 8: Tape and close
On the back of the solar panels, cover the two brass rivets with double-sided tape (so they don't make contact with the Altoids tin.) Tape the two solar panels on the inside lid of the tin. Tuck the main wire into the case and close. Go somewhere sunny and charge it up!
MATERIALS:
* 1 Altoids Tin case
* 2 Mini Solar Panels (3V 20mA each)
* 1 Solder (3")
* 1 Small Heat Shrink Tubing (4")
* 1 Large Heat Shrink Tubing (4")
* 1 Double Sided Tape (3")
* 1oz Flux
* 1 Solder Iron
* 1 Heat Gun
* 1 Wire Stripper
* 1 cell phone charger
STEP 1: Cut wires & tubing
Take the 2 solar power panels and cut all four wires to about 1" in length. Cut 1/4" of plastic off of the tip of each wire with the wire stripper so copper wires are exposed. This exposed wire is called a 'lead.' Cut thesmall heat shrink tubing into four equal pieces (1" each). Slide the small heat shrink tubing onto both black wires.
STEP 2: Solder solar panel leads
Using a toothpick, paint leads with flux on a red wire from one solar panel, and a black wire from the other solar panel. Put those two leads together, and solder using your piece of solder and the soldering iron.
STEP 3: Heat-shrink tubing
Slide small heat shrink tubing over the leads you just soldered together. Heat the tubing with heat gun just enough for it to shrink.
STEP 4: Cut phone charger wire
Cut off the wire from your old charger to about 2.5 feet and strip off 2.5" of outer plastic from the loose end. Cut 1/4" off of each of the inside wires to make leads. Slide the full length of the large heatshrink tubing onto this main wire for later use in Step 6.
STEP 5: Flux, solder and heat-shrink loose leads
On your main wire, slide a piece of small heat shrink tubing onto the red wire. Flux all loose leads of main wire as well as the solar panels with the toothpick. Solder red leads from main wire and solar panels together. Repeat with black wires. Slide heat shrink tubings over these soldered leads and use heat gun to shrink.
STEP 6: Test charger
Test the charger by connecting it to a phone under bright light.
STEP 7: Heat-shrink solar panel leads
On your main wire, slide large heat shrink tubing over the two soldered leads which connect to the solar panels. Use the heat gun to shrink the tubing.
STEP 8: Tape and close
On the back of the solar panels, cover the two brass rivets with double-sided tape (so they don't make contact with the Altoids tin.) Tape the two solar panels on the inside lid of the tin. Tuck the main wire into the case and close. Go somewhere sunny and charge it up!
No comments:
Post a Comment